Showing posts with label APEX. Show all posts

Friday, July 19, 2024

AI Integration with Oracle APEX: Enhancing Business Applications

In the rapidly evolving landscape of business technology, Artificial Intelligence (AI) has emerged as a transformative force. Integrating AI into existing systems can significantly enhance their capabilities, providing advanced data analysis, predictive analytics, and automated decision-making processes. Oracle Application Express (APEX), a powerful low-code development platform, is no exception. By integrating AI with Oracle APEX, businesses can unlock new potentials and drive more value from their applications.

What is Oracle APEX?

Oracle APEX is a low-code development platform that enables users to build scalable, secure enterprise applications with minimal coding. It provides a robust environment for creating modern web applications, dashboards, and reports, making it an ideal choice for businesses looking to streamline their development processes.

Benefits of AI Integration with Oracle APEX

Integrating AI with Oracle APEX offers numerous advantages:

  1. Enhanced Data Analysis: AI algorithms can process vast amounts of data quickly, uncovering insights that would be difficult to detect manually. This leads to more informed decision-making and a deeper understanding of business trends.

  2. Predictive Analytics: AI can analyze historical data to predict future trends, helping businesses to anticipate market changes, customer behavior, and potential risks. This proactive approach can give companies a competitive edge.

  3. Automated Decision-Making: AI can automate routine decision-making processes, freeing up human resources for more strategic tasks. This improves efficiency and reduces the likelihood of human error.

  4. Personalized User Experience: AI can tailor applications to individual users based on their behavior and preferences, enhancing user satisfaction and engagement.

Oracle has integrated AI capabilities into Oracle APEX to enhance its functionality and provide users with advanced data analysis, predictive analytics, and automated decision-making tools. Here are some key ways in which Oracle has already integrated AI into Oracle APEX:

1. Oracle Autonomous Database

Oracle APEX is designed to work seamlessly with the Oracle Autonomous Database, which incorporates AI and machine learning for various tasks such as performance tuning, fault detection, and security management. This integration allows APEX applications to benefit from the self-managing capabilities of the Autonomous Database.

Features:

  • Automated Performance Tuning: The Autonomous Database uses AI to automatically tune performance based on the workload.
  • Fault Detection and Self-Repair: AI-driven mechanisms detect and repair faults without human intervention.
  • Enhanced Security: AI is used to identify and mitigate security threats in real time.

2. Oracle Machine Learning (OML)

Oracle Machine Learning provides a suite of tools that enable data scientists and developers to build, train, and deploy machine learning models within the Oracle ecosystem. APEX can leverage these machine learning models to enhance application functionality.

Features:

  • Integration with SQL and PL/SQL: Developers can use SQL and PL/SQL to interact with machine learning models directly within APEX.
  • Automated Machine Learning: Tools like AutoML simplify the process of creating machine learning models, making it accessible to non-experts.
  • Advanced Analytics: Machine learning models can be used to provide advanced analytics and predictions within APEX applications.

3. Oracle Digital Assistant

Oracle Digital Assistant (ODA) is an AI-powered chatbot platform that can be integrated with APEX applications to provide conversational interfaces for users. This allows for more interactive and user-friendly applications.

Features:

  • Natural Language Processing (NLP): ODA uses NLP to understand and respond to user queries in natural language.
  • Multi-Channel Support: Chatbots can be deployed across various channels, including web, mobile, and messaging platforms.
  • Contextual Conversations: AI-driven context management ensures that conversations are coherent and relevant.

4. Oracle Analytics Cloud

Oracle Analytics Cloud integrates with Oracle APEX to provide advanced analytical capabilities, including AI-driven insights and visualizations. This integration allows APEX applications to include sophisticated data analysis features.

Features:

  • Predictive Analytics: AI algorithms analyze historical data to predict future trends and outcomes.
  • Data Visualization: Advanced visualization tools present data insights in a user-friendly and interactive manner.
  • Self-Service Analytics: Users can explore data and generate reports without needing technical expertise.

5. AI and Machine Learning APIs

Oracle offers various AI and machine learning APIs that can be integrated with APEX applications to provide additional AI capabilities.

Features:

  • Image and Text Analysis: APIs for image recognition, text analysis, and natural language understanding can enhance application functionality.
  • Anomaly Detection: AI models can detect anomalies in data, helping to identify potential issues or opportunities.
  • Recommendation Systems: AI-driven recommendation systems can personalize user experiences based on behavior and preferences.

Autonomous Database Performance Metrics

A dashboard displaying real-time performance metrics, including CPU usage, active sessions, and automatic tuning actions taken by the database.

Machine Learning Model Usage

A SQL Workshop interface with scripts for creating, training, and querying machine learning models. You might also see an interactive report that uses the results of these models to display predictive analytics.

Digital Assistant Interface

An APEX application page with a chatbot widget. The widget interacts with the user, providing responses and actions based on the conversation context.

Analytics Dashboards

An APEX application page featuring various data visualizations such as bar charts, line graphs, and heat maps, all generated using Oracle Analytics Cloud.

RESTful API Integration

The Shared Components section showing defined RESTful services, with examples of API calls and their integration into application processes.

These features provide a robust set of tools to enhance Oracle APEX applications with AI capabilities, offering advanced functionality and insights that can drive business value. For actual screenshots, you might want to refer to Oracle's official documentation, tutorials, or contact Oracle support for specific examples and visual guides.

Conclusion

Oracle has made significant strides in integrating AI capabilities into Oracle APEX, enabling users to create more powerful, efficient, and intelligent applications. By leveraging these AI tools and services, businesses can enhance their data analysis, improve decision-making processes, and deliver a more personalized and engaging user experience. As Oracle continues to innovate, the integration of AI with Oracle APEX is expected to expand, providing even more opportunities for businesses to harness the power of AI.

Thursday, September 14, 2023

Creating and Copying an Application in APEX by using various options

Create an Application in APEX

An application can be created from the "Create" Application Wizard once you login to the APEX workspace


Common use cases when using the Create Application Wizard include:

  • Create an app from existing data. Create an application and set of initial pages based on existing data from a table or a query. Then, select application features, specify a theme, and configure options

  • Create an app and add pages. Create an application and then add pages one at a time using the Create Page Wizard

  • Create an app from a file. Create an application from a file by uploading a CSV, XLSX, XML, or JSON file, or by copying and pasting data directly into the wizard

  • Create an app based on a script. Create an application containing many pages from a saved script in SQL Scripts

  • Create an app based on a dataset. After you install a sample data set, you have the option to create an application containing multiple pages on that dataset

Once you click on the Create Application Wizard, you will see the following screen


1. If you choose to Create a New Application you will see the following screen


Enter the Name

Under the Appearance, you will see the following options


Under the Theme Style

You can either choose Vita or Vita-Dark or Redwood Light

In the Navigation

You can have either Side Menu or Top Menu or Mega Menu depending on your requirement

Once done, click on save Changes. You will be back to Create Application Wizard page

By Default Home page and few other pages will be added. If you want to add more pages you can click on Add Page under Pages section


Then comes the Features section. The following options you will have to choose

  • Install Progressive Web App

  • Push Notifications

  • About Page

  • Access Control

  • Activity Reporting

  • Configuration Options


Once done Click on Create Application button, it will spin up the App for you within the workspace you have requested and logged in.

2. If you choose to Create An Application from a File

You will see the following screen


There are two options in which either you can opt to Upload a File or Copy and Paste. The Copy and Paste looks as below


In this case I have decided to upload a csv format. Once you upload, it takes you to the next page with the following options

Load to: New Table or Existing Table

Table Owner:

Table Name:

Primary Keys:

You can Preview the data that being parsed and make necessary changes

Once done, click on Load Data to create an Application

3. If you choose to Create an Application from the Starter App

You will see the following screen, where you can choose an app that needs to install


Once you click on the Install button on any app, a pop window comes up to confirm the apps installation

In this case, I selected APEX PWA Reference App


Once done, click on Install Application button to install the app

4. Copying an Application by Running the Create Application Wizard 

To copy application by running the Create Application Wizard:

  1. On the Workspace home page, click the App Builder icon

  2. Click the Create button. The Create Application Wizard appears

  3. Select the Copy Application link at the bottom of the window and click Next

  4. For Identify Copy Target:

    • Copy From - Select the name of the application to copy

    • Copy To - Enter a short descriptive name for the application to distinguish the new application in select lists and reports

    • New Application ID - Specify an integer value that identifies the application. The application ID must be unique within your Oracle APEX instance. Application IDs in the range of 3000 to 9000 are reserved for internal use by APEX

    • Copy Supporting Object Definitions - You can copy supporting object definitions, configuration options, and scripts with your application. Select On to include database object definitions, image definitions, and seed data SQL statements encapsulated in a single file. Select Off to not include supporting object definitions.


5. Copying an Application from the Application Home Page  

  1. On the Workspace home page, click the App Builder icon

  2. Select an application to copy
    The Application home page appears

  3. From the Tasks list, click Copy this Application

  4. For Identify Copy Target:
    1. New Application ID - Enter a unique integer value to identify the application. Application IDs between 3000 to 9000 are reserved for internal use.

    2. New Application Name - Enter a short descriptive name for the application to distinguish the new application in select lists and reports.

    3. Copy Supporting Object Definitions - Copy supporting object definitions, configuration options, and scripts with your application.. Options include:

      • On - Include database object definitions, image definitions, and seed data SQL statements encapsulated in a single file.

      • Off - Do not include supporting object definitions.

    4. Click Next.     

  5. Click Copy Application

Wednesday, September 6, 2023

Enable SSO Login in APEX

Enable SSO Login in APEX

Login to your Workspace

Click on Shared Components


On the Security section

Choose Authentication Schemes


Click on Create


Under Name section enter 

Name: SSO

Scheme Type: SAML Sign-In

Under Settings section enter

Use SAML Attributes of: Instance

Convert Username To Upper Case: Yes


Click on Apply Changes

This SSO Authentication scheme which you created will enable the SSO login for your apps in the APEX workspace.


Enable Navigation Mega Menu in APEX

Enable Navigation Mega Menu in APEX

Login to APEX 

Select the Application where you want to enable the Top Navigation Mega Menu

Click on Shared Components and then 

         -> User Interface

         -> User Interface Attributes

         -> Navigation Menu

Under the List Template

Choose

Top Navigation Mega Menu

Under Template Options

         -> Use Template Defaults

         -> Display Menu Callout

Once done, click on Apply Changes Button


Other options available under List Template are


You can use the different options according to your needs

The position of the Navigation Mega Menu can be changed from Top to Side by using the Position option available


Tuesday, September 5, 2023

Send an Email from APEX

Send an Email from APEX

There are couple of ways in which you can send email from APEX, lets go through 

1. Use the combination of PLSQL, HTML and APEX_MAIL

    In this case we are fetching the data from Table into cursor and putting the data through a loop and formatting it using HTML in a table format and then sending an email using APEX_MAIL


DECLARE

l_body CLOB := NULL;

CURSOR c1 IS select PROPERTY, WEEK, ALERTS, JIRA, HOST, AVG_OPEN_ALERTS from WEEKLY_STATS where property='ABC' order by ID desc fetch first 5 rows only;

CURSOR c2 IS select PROPERTY, WEEK, ALERTS, JIRA, HOST, AVG_OPEN_ALERTS from WEEKLY_STATS where property='XYZ' order by ID desc fetch first 5 rows only;

BEGIN

l_body := l_body

|| '<head>

<style>

table, th, td {

  border:.05px solid black;

  }

table {

        text-align: center;

}

</style>

</head>

<h2><a href="https://apex.oracle.com/pls/apex/r/<workspace>/<app_name>/<Link>">ABC</a></h2>

<table style="width:100%"><tr>

<th><b>WEEK</b></th>

<th>ALERTS</th>

<th>JIRA</th>

<th>HOST</th>

<th>AVG_OPEN_ALERTS</th> </tr>';


FOR rec IN c1 LOOP

l_body := l_body ||'</td> <td>' || rec.WEEK

||'</td> <td>' || rec.ALERTS

||'</td> <td>' || rec.JIRA

||'</td> <td>' || rec.HOST

||'</td> <td>' || rec.AVG_OPEN_ALERTS

||'</td> </tr>'|| utl_tcp.crlf;

END LOOP;

l_body := l_body || '</table>' || utl_tcp.crlf;

l_body := l_body || '<br>' || utl_tcp.crlf;

l_body := l_body || '</td>'|| utl_tcp.crlf;

l_body := l_body || '</tr>'|| utl_tcp.crlf;

l_body := l_body || '</table>'|| utl_tcp.crlf;


l_body := l_body

|| '<head>

<style>

table, th, td {

  border:.05px solid black;

  }

table {

        text-align: center;

}

</style>

</head>

<h2><a href="https://apex.oracle.com/pls/apex/r/<workspace>/<app_name>/<Link>">XYZ</a></h2>

<table style="width:100%"><tr>

<th><b>WEEK</b></th>

<th>ALERTS</th>

<th>JIRA</th>

<th>HOST</th>

<th>AVG_OPEN_ALERTS</th> </tr>';


FOR rec IN c2 LOOP


l_body := l_body ||'</td> <td>' || rec.WEEK

||'</td> <td>' || rec.ALERTS

||'</td> <td>' || rec.JIRA

||'</td> <td>' || rec.HOST

||'</td> <td>' || rec.AVG_OPEN_ALERTS

||'</td> </tr>'|| utl_tcp.crlf;


END LOOP;


l_body := l_body || '</table>' || utl_tcp.crlf;

l_body := l_body || '<br>' || utl_tcp.crlf;

l_body := l_body || '</td>'|| utl_tcp.crlf;

l_body := l_body || '</tr>'|| utl_tcp.crlf;

l_body := l_body || '</table>'|| utl_tcp.crlf;


--dbms_output.Put_line(l_body);


apex_mail.Send(p_to => 'test_send_mail@gmail.com',

p_from => 'test.server@oracle.com',

p_subj => 'Weekly Volume ABC and XYZ',

p_body => l_body,

p_body_html => l_body);


apex_mail.push_queue;


END;


The Email Content:

2. Second way of sending an email using

Within the APEX page created, go to Processing section and under Processes section create a Process by name "Send E-Mail"


On the Right Side Pane, under Process in the Identification section

Name: Send E-Mail

Type: Send E-mail

Execution Chain: None

Editable Region: Leave it to default value


Under the
Settings section

From: &APP_EMAIL.

Totest_send_mail@gmail.com

Add Cc, Bcc and Reply To if required

Email Template: select if you have created one, if not leave it to default value

Subject: Add the Subject


Add the following in the Body HTML section. We are going to fetch the values from the Page Items and send those data through an email

<head>

<style>

table, th, td {

  border:.05px solid black;

  }

table {

        text-align: center;

}

</style>

</head>


<h3>Please find the Weekly Volume of ABC and XYZ Properties</h3>


 <table style="width:100%">

  <tr>

    <th>PROPERTY</th>

    <th>JIRA</th>

    <th>ALERTS</th>

    <th>AVG_OPEN_ALERTS</th>

    <th>HOST</th>

  </tr>

  <tr>

    <td>&P2006_PROPERTY.</td>

    <td>&P2006_JIRA.</td>

    <td>&P2006_ALERTS.</td>

    <td>&P2006_AVG_OPEN_ALERTS.</td>

    <td>&P2006_HOST.</td>

  </tr>

  <tr>

    <td>&P2006_PROPERTY_1.</td>

    <td>&P2006_JIRA_1.</td>

    <td>&P2006_ALERTS_1.</td>

    <td>&P2006_AVG_OPEN_ALERTS_1.</td>

    <td>&P2006_HOST_1.</td>

  </tr>

</table> 


The Email Content:


Monday, September 4, 2023

Save Data Temporarily using APEX_COLLECTION in APEX

Overview

Apex Collections (APEX_COLLECTION) is a package that comes with Oracle Apex and is one of the most important features that comes with Oracle APEX. Each member has a sequence number and each collection must have a unique name.

Use Case

We can use the Apex Collection in our PL/SQL programs, in reports such as Interactive reports, interactive grid, etc. Apex are the temporary storage for the current session, in which you can add the data, access the data, and can do other lots of things.

Create a collection

Use apex_collection.create_collection method to create a collection. Collections in Oracle Apex are the temporary storage for the current session, in which you can add the data, access the data, and can do other lots of things.

Example:

apex_collection.create_collection(‘EMPLOYEE_COLLECTION’);

The above example is used to create a collection.

Check if a collection already exists

Before creating a collection, make sure it does not exists already.

Use the apex_collection.collection_exists method to check whether a collection exists already.

Refer the below example:

Example:

if not apex_collection.collection_exists(‘EMPLOYEE_COLLECTION’) then

apex_collection.create_collection(‘EMPLOYEE_COLLECTION’);

end if;

The above PL/SQL command will create a collection named EMPLOYEE_COLLECTION.

Truncate a collection

If a collection already exists and you want to make it empty so that you can add the new data.

Use the apex_collection.truncate_collection method to delete all the data from a particular collection.

Example:

if not apex_collection.collection_exists(‘EMPLOYEE_COLLECTION’) then

apex_collection.create_collection(‘EMPLOYEE_COLLECTION’);

else

apex_collection.truncate_collection(‘EMPLOYEE_COLLECTION’);

end if;

The above PL/SQL code will check if the collection EMPLOYEE_COLLECTION already exists, if not, then it will create a collection, and if it exists, then it will truncate the collection.

Populate it with data using PL/SQL

We have created a collection.  Now we are going to add data into it. Use apex_collection.add_member to add a data row in it.

Example:

apex_collection.add_member(

p_collection_name => ‘EMPLOYEE_COLLECTION’,

p_c001 => :P3_EMP_NO,

p_c002 => :P3_EMP_NAME,

p_c003 => :P3_EMP_SAL

);

The above PL/SQL code will add a row to the collection EMPLOYEE_COLLECTION, with three columns p_c001 as EMP_NO, p_c002 as EMP_NAME, and p_c003 as EMP_SAL.

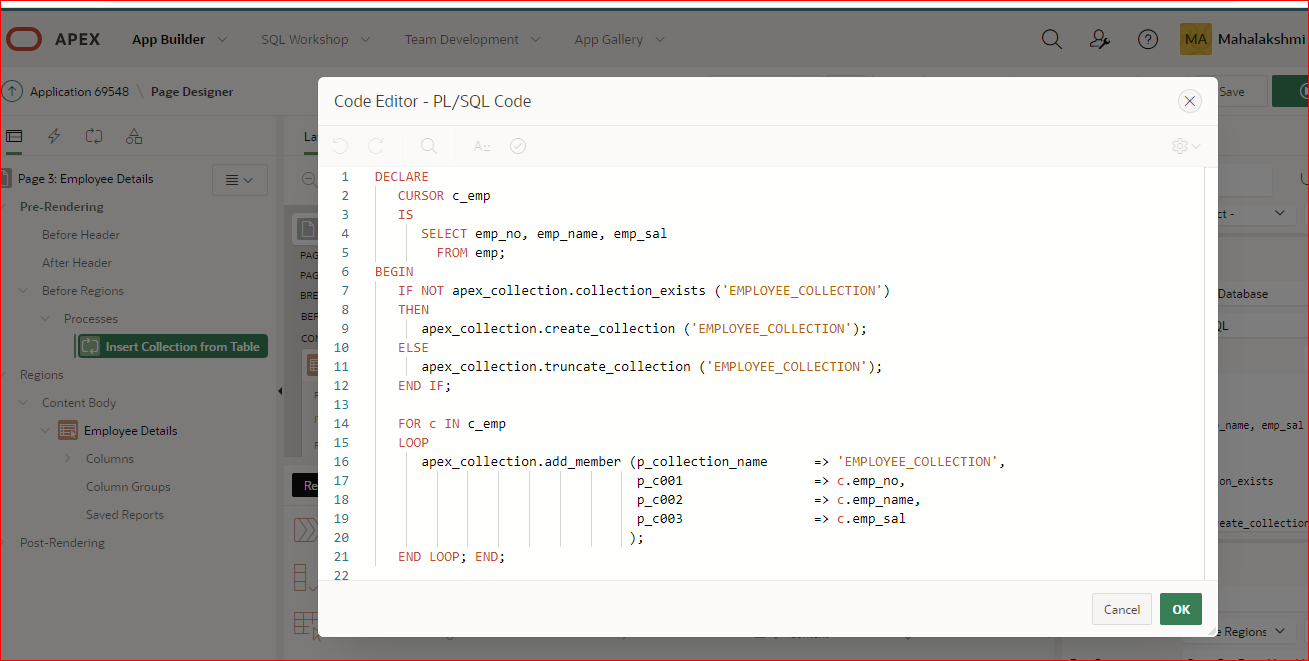
We will populate the collection EMPLOYEE_COLLECTION from the EMP table using the cursor in the below Example.

Example:

DECLARE

CURSOR c_emp

IS

SELECT emp_no, emp_name, emp_sal

FROM emp;

BEGIN

IF NOT apex_collection.collection_exists (‘EMPLOYEE_COLLECTION’)

THEN

apex_collection.create_collection (‘EMPLOYEE_COLLECTION’);

ELSE

apex_collection.truncate_collection (‘EMPLOYEE_COLLECTION’);

END IF;

FOR c IN c_emp

LOOP

apex_collection.add_member (p_collection_name      => ‘EMPLOYEE_COLLECTION’,

p_c001                 => c.emp_no,

p_c002                 => c.emp_name,

p_c003                 => c.emp_sal

);

END LOOP; END;

I have added the above code in a process in oracle apex.

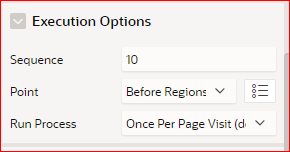
In the execution option we should select “Before Regions” point as shown in the below picture.

Query a collection.

SELECT c001 empno, c002 ename, c003 salary

FROM apex_collections

WHERE collection_name = ‘EMPLOYEE_COLLECTION’

We can use this SQL query in our PL/SQL programs, in reports such as Interactive reports, interactive grid, etc.

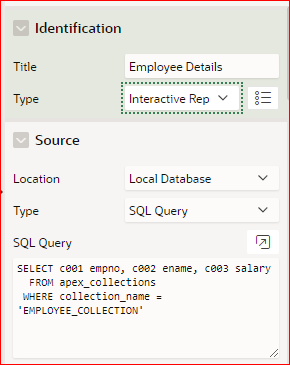
Now I have created a region and mention type is ‘Interactive Report’. Add the above query in the source. Please refer the below screenshot.

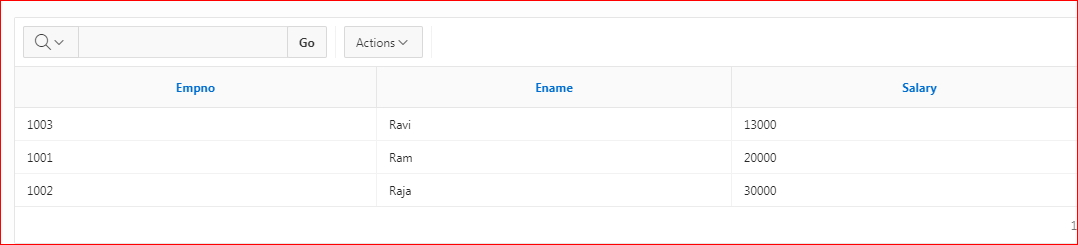
If you run the page you will get the output as shown in the below.

Friday, September 1, 2023

Alert and Confirm Dialogs in APEX

Customizable Dialogs

Dynamic Actions provide a way to define complex client-side behavior declaratively. Developers can specify actions to be performed when a specific event occurs. The Alert and Confirm Dialogs now have an updated appearance and customize options for easily setting the style, title, icon, and even custom button labels.

To create either an alert or confirm dialog, follow these steps.

Create a page

  1. Create a Blank Page using the Create Page Wizard. 
  2. For Name - enter Sample Customizable Dialogs anc click Next.
  3. For Navigation Preference, select Create a new navigation menu entry and click Next.
  4. Click Finish.

Create a button

  1. In Page Designer, right-click Components in the left pane.
    Fig 1. Create a Button.


  2. In the Property Editor (right pane), enter the following:
    1. Under Identification section:
      For Button Name - enter Delete
      For Label - enter Delete Record

Create a Dynamic Action

  1. Click the Dynamic Actions tab in the left pane.
  2. Under Dynamic Actions, right-click Events and select Create Dynamic Action.
    Fig 2. Create a Dynamic Action.
  3. In the Property Editor (right pane), edit the following Dynamic Action attributes:
    1. Under Identification section:
      For Name - enter Deleting a record.
    2. Under When section:
      Event - select Click
      Selection - select Button
      Button - select Delete.
  4. In the left pane, navigate to the Show action created by default.
  5. In the Property Editor (right pane), edit the following attributes:
    1. Under Identification section:
      For Action - select Confirm. If you prefer to create an alert action, please note that you will find OK Label attribute instead of Confirm and Cancel Label attributes.
    2. Under Settings section:
      For Title - enter Delete Record
      For Message - Are you sure to delete this record?
      For Style - select Danger
      For Icon - optionally select a dialog icon
      For CSS Classes -  enter optional CSS Classes to be applied to the dialog container. This property can be useful for advanced use cases
      For Confirm Label - enter Delete. If no label is provided, the value of text message APEX.DIALOG.OK  (Ok in English) will be used
      For Cancel Label - enter Cancel. If no label is provided, the value of text message APEX.DIALOG.CANCEL (Cancel in English) will be used.
  6. Click Save and Run Page.

As an example, these are the attributes for the confirm dialog:

Fig 3. Attributes for the Confirm action.


When users trigger the event, they will get a similar confirm dialog:

Fig 4. Confirm Dialog in execution.


If users decide to click the Delete button, all the subsequent actions to the Confirm dialog will be executed. Otherwise, the dynamic action will be stopped.

Support for Template Directives

The dialog message supports HTML template directives, including client-side substitutions of item references for truly dynamic alerts.

Button Confirmation

We have also simplified protecting a button's action with a confirmation dialog. In previous versions of APEX, you would use the apex.confirm JavaScript function to protect the button's behavior with a confirmation prompt. For example, to show a confirmation dialog after the Delete button has been clicked this was the setup by default:

Fig 5. Confirmation delete message in previous versions of APEX.


As of APEX 21.2, you can trigger a confirmation dialog for any button by simply toggling the "Require Confirmation" property. In this case, the confirmation button in the dialog derives its label from the main button label.

Fig 6. New confirmation delete message in APEX 21.2


Let's review both support for template directives and button confirmation enhancements using a simple Form region. Please follow these steps:

For this example, you would need to install the EMP / DEPT Sample Dataset.

  1. Create a Report with Form page using the Create Page Wizard. 
  2. Select Form and click Next.
  3. Select Report with Form and click Next.
  4. Enter the following and click Next. 
    1. For Report Page Name - enter Employees
    2. For Form Page Name - enter Manage
    3. For Breadcrumb - select  Breadcrumb.
  5. For Navigation Preference, select Create a new navigation menu entry and click Next.
  6.  Enter the following and click Next.
    1. For Table / View Name - enter EMP.
  7. Enter the following and click Next.
    1. For Primary Key Column - select EMPNO (Number).
  8. Click Create.

Now you have two new pages: Report Page and Form Page. Let's edit the Form Page and apply some changes to the Create button to ask the user to confirm the commission amount that employee will receive.

  1. Run the recently created page and click Create button.
    Fig 7. Employees Page in runtime


  2. Navigate to Developer Toolbar (bottom of the page) and click Page X.
  3. In the left pane, navigate to Create button.
  4. In the Property Editor (right pane), enter the following: 
    1. Under Behavior section:
      - Switch on the Requires Confirmation property.
    2. Under Confirmation section:
      - For Message - enter the following code:

      {if !PX_COMM/}
      Are you sure that <strong>&PX_ENAME.</strong> will not receive a commission?
      {else/}
      Please confirm that <strong>&PX_ENAME.</strong> will receive &PX_COMM. USD as commission.
      {endif/}


      Edit the following items with the page number you are working on:
      - PX_COMM. If the page number is 3, the item name would be P3_COMM.
      - PX_ENAME. If the page number is 3, the item name would be P3_ENAME.


      - For Style - select Warning.
  5. Click Save and Run Page.

To create a new employee, enter some details like Name, Job, Salary and click Create. You will get this confirmation message, since the commission item is null.

Fig 8. Confirmation Message when the commission item is null


If you enter a Commission value, let's say 500 USD you will get the following confirmation message:

Fig 9. Confirmation Message when the commission item is not null